In an effort to improve our cybersecurity protection and in keeping with industry best practices, as of June 3, 2024, Wilkes will switch to a new VPN client, Forticlient VPN.
Faculty and staff who have a University-owned Windows computer will receive the update to the VPN automatically and should discontinue use of Cisco AnyConnect as of June 3, 2024. Please note that when the update occurs on your computer, you may see a notification in the lower right corner of your screen. No further action is needed.
Mac users and students, faculty or staff who use their own computers to access the VPN will need to perform a one-time software installation. They will also need to uninstall Cisco AnyConnect. Instructions on installation, including how to install Forticlient VPN and uninstall Cisco AnyConnect, can be found below.
Questions? Please contact the Help Desk at 570-408-4357 or helpdesk@wilkes.edu.
Guided Tutorials
Installing Forticlient VPN
Prior to installing the FortiClient VPN, it is recommended that you uninstall Cisco AnyConnect.
-
Download and run the FortiClient VPN installer. Follow the prompts during the install process.
-
After the installation is complete, select the FortiClient VPN icon on your desktop. When opening the VPN client for the first time, check the acknowledgement box and select the I accept button.

-
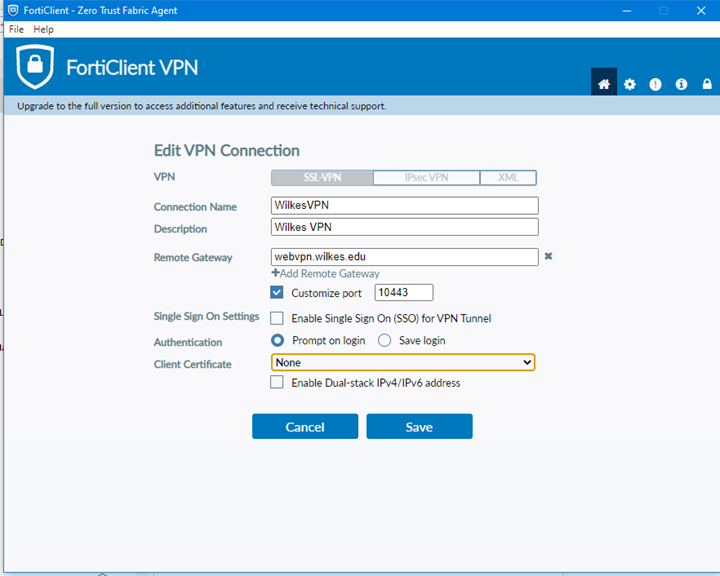
On the next screen, select Configure VPN. In the New VPN Connection screen, SSL-VPN should be selected by default for the VPN option. Enter the following information:
- Connection Name: Wilkes VPN
- Description: Wilkes VPN
- Remote Gateway: webvpn.wilkes.edu
- Check the box for Customize port and in the text box, type 10443
- Leave Enable Single Sign On (SSO) for VPN Tunnel unchecked
- Authentication: Prompt on login
- In the drop-down menu for Client Certificate, select None
-
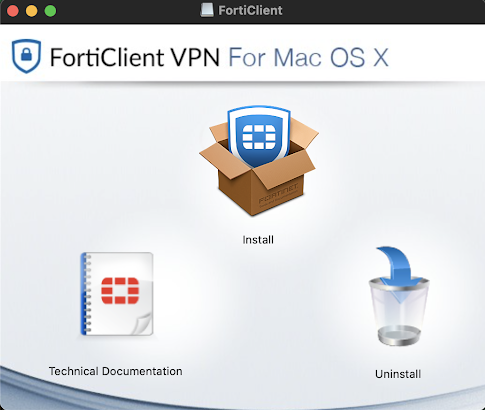
Download and run the FortiClient install manager
-
In the FortiClient install manager, select Install. If you are prompted to allow access to files, select OK.
- In the installer window, follow the prompts on the screen to install the client. You will need to enter your device password and select Install Software.
-
Before the installation completes, you may receive a System Extension Blocked pop up window. Select Open System Preferences or Open System Settings.
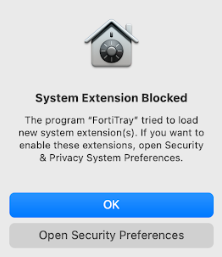
-
In System Settings, select the Allow button next to the option that states System software from “FortiTray” was blocked from loading and enter your device password to allow this change.

-
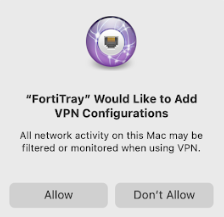
Once allowed, close the Security & Privacy window and select Allow in the “FortiTray” would like to add VPN Configurations window.
- Once installed, select Close. At this point, the FortiClient install manager can be closed as well. Once closed, in the top menu bar, select Go > Applications.
- In Applications, find and open the FortiClient app.
-
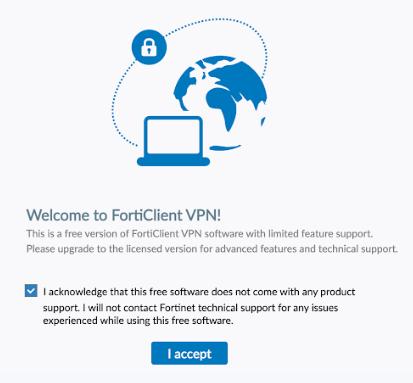
In the FortiClient app, check the acknowledgment box and select I accept.
-
On the next screen, select Configure VPN. In the New VPN Connection screen, SSL-VPN should be selected by default for the VPN option. Enter the following information:
- Connection Name: Wilkes VPN
- Description: Wilkes VPN
- Remote Gateway: webvpn.wilkes.edu
- Check the box for Customize port and in the text box, type 10443
- Leave Enable Single Sign On (SSO) for VPN Tunnel unchecked
- Authentication: Prompt on login
- In the drop-down menu for Client Certificate, select None
- Once done, double check to make sure all information is correct. After checking, select the Save button to submit the configuration for the VPN client.
Uninstall Cisco AnyConnect
-
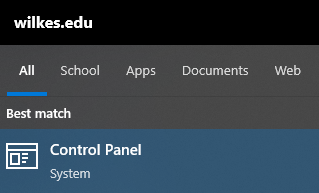
In the Windows search box located on the task bar, do a search for Control Panel. Once searched, the first option should show the Control Panel application. select this option to open it,
-
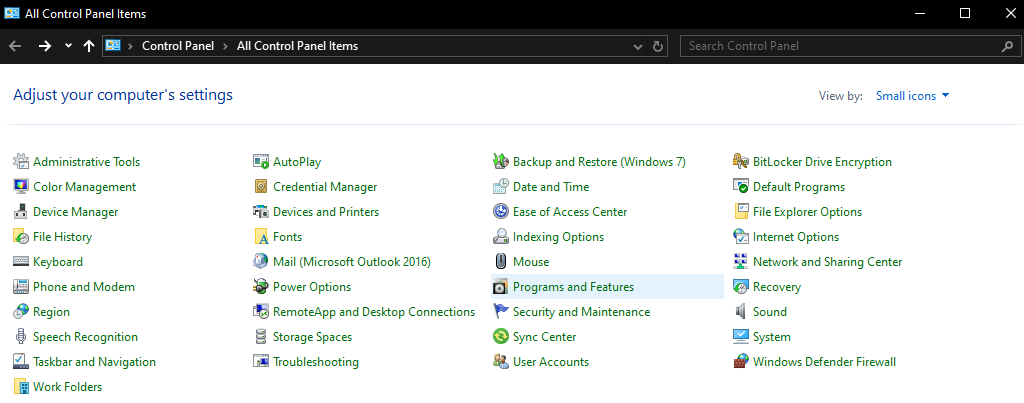
Inside Control Panel, select Programs and Features (you may first need to set the View by setting in the upper right to Small icons).
-
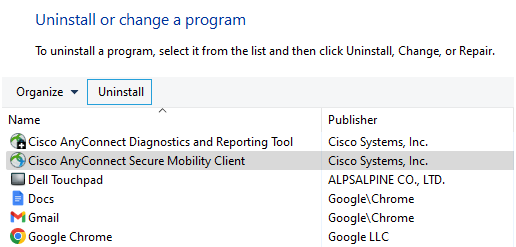
In Programs and Features, select Cisco AnyConnect Mobility Client and select the Uninstall button in the top row. A Windows dialog box will open. select Yes to continue.
-
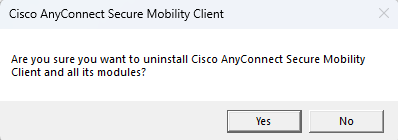
A Cisco AnyConnect window will open. select Yes. Once done, the box will close and Cisco AnyConnect will now be uninstalled.
-
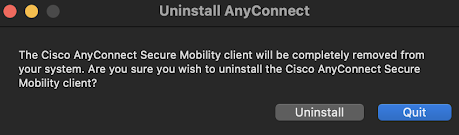
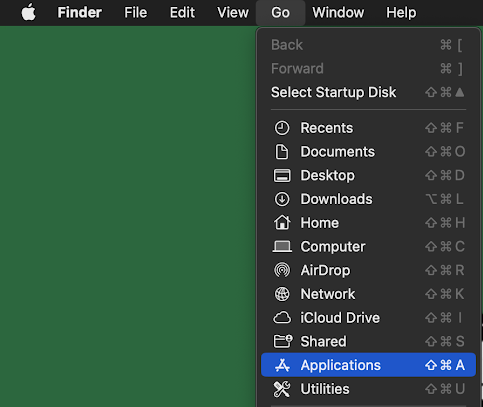
In the top menu bar, select Go. From the drop-down menu, select Applications.
-
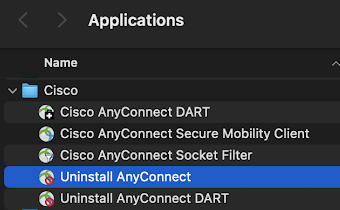
In Applications, open the Cisco folder. Inside the folder, select Uninstall AnyConnect.
-
Once the Uninstall AnyConnect box opens, select Uninstall. A box will open to enter your Mac credentials to uninstall the application. Enter your password and select Ok. After this is done, the Cisco AnyConnect client will be uninstalled.